Help docs
Select a topic from the list.
API
how-to-trigger-a-sendAdmin
a-list-of-user-access-permissionshow-to-add-a-group
how-to-add-a-user
how-to-change-a-group-logo
how-to-edit-user-permissions
how-to-mass-manage-users
Campaigns
how-to-create-a-campaignhow-to-edit-campaign-settings
Code Editor
code-editor-overviewhow-to-include-a-view-in-browser-link
how-to-include-an-unsubscribe-link
how-to-include-dynamic-content-in-your-email
how-to-make-html-elements-editable-data-see
how-to-personalize-by-first-name
how-to-use-javascript-in-your-email
improve-reporting-with-linknames
key-board-short-cuts
ESP
how-to-add-ses-as-your-esphow-to-add-sparkpost-as-your-esp
Images
how-to-move-imageshow-to-upload-images
Reporting
how-to-export-a-csvhow-to-generate-a-pdf
overview-serious-email-analytics
Sending
how-to-send-overviewSettings
how-to-add-a-from-addresshow-to-change-owner-of-a-from-address
how-to-edit-your-account-settings
how-to-share-a-from-address
Subscribers
how-to-assign-subscriber-lists-to-a-campaignhow-to-clean-a-subscriber-list
how-to-edit-a-subscriber
how-to-export-a-csv
how-to-import-subscribers
how-to-resubscribe-a-subscriber
how-to-share-a-list-across-groups
how-to-share-a-list-with-other-users
Templates
how-to-access-preview-linkshow-to-clone-a-template
how-to-mass-clone-a-template
how-to-search-and-replace-in-multiple-templates
how-to-set-up-a-test-send
how-to-zip-and-export-templates
template-manager-overview
Users
how-to-mass-manage-usersVisual Editor
visual-editor-overviewCode Editor: how to make html elements editable data see
The Code Editor is for HTML email developers to write raw code. One critical feature of this is the ability to make HTML elements editable in the Visual Editor. What does making an HTML element editable really mean? It means that, in the Visual Editor, the element becomes content that any non-developer can click on and edit. There is no requirement for HTML skills.
Now, many services offer WYSIWYG type editing, but it's always restrictive. Serious Email is different. Account managers can generate new emails in minutes, but they won't be forced to squeeze their content into some generic template. Instead, you - the developer - can generate your own customized HTML templates for them. Templates that match your company's brand and specific needs. This is all possible by simply adding "data-see" to an element. However, there are a few tricks to make it even more powerful. This document is to help you understand how to make a template and how to use and get the most out of "data-see" attributes.
"data-see" is an attribute. When you add it various HTML elements you are telling the Visual Editor to make it editable.
The Code Editor can be opened for an existing template or by creating a new one. To do either, visit the Templates Manager Templates Manager. To create a new template in the code editor please click the "+" button at the top right of the Templates Manager. Or open an existing template by clicking the "Code" button.
data-see and the <span> Tag or <p> Tag
One way to make a small amount of inline text editable is to wrap it in a <span> Tag or <p> Tag. This will make it so the end user can edit any copy in the <span> Tag or <p> Tag as well more complicated HTML editing via WYSIWYG editor. Here's an example of how to add it:<span data-see="" > Hello World. </span>
The same is true of the <p> tag:<p data-see="" > Hello World. </p>
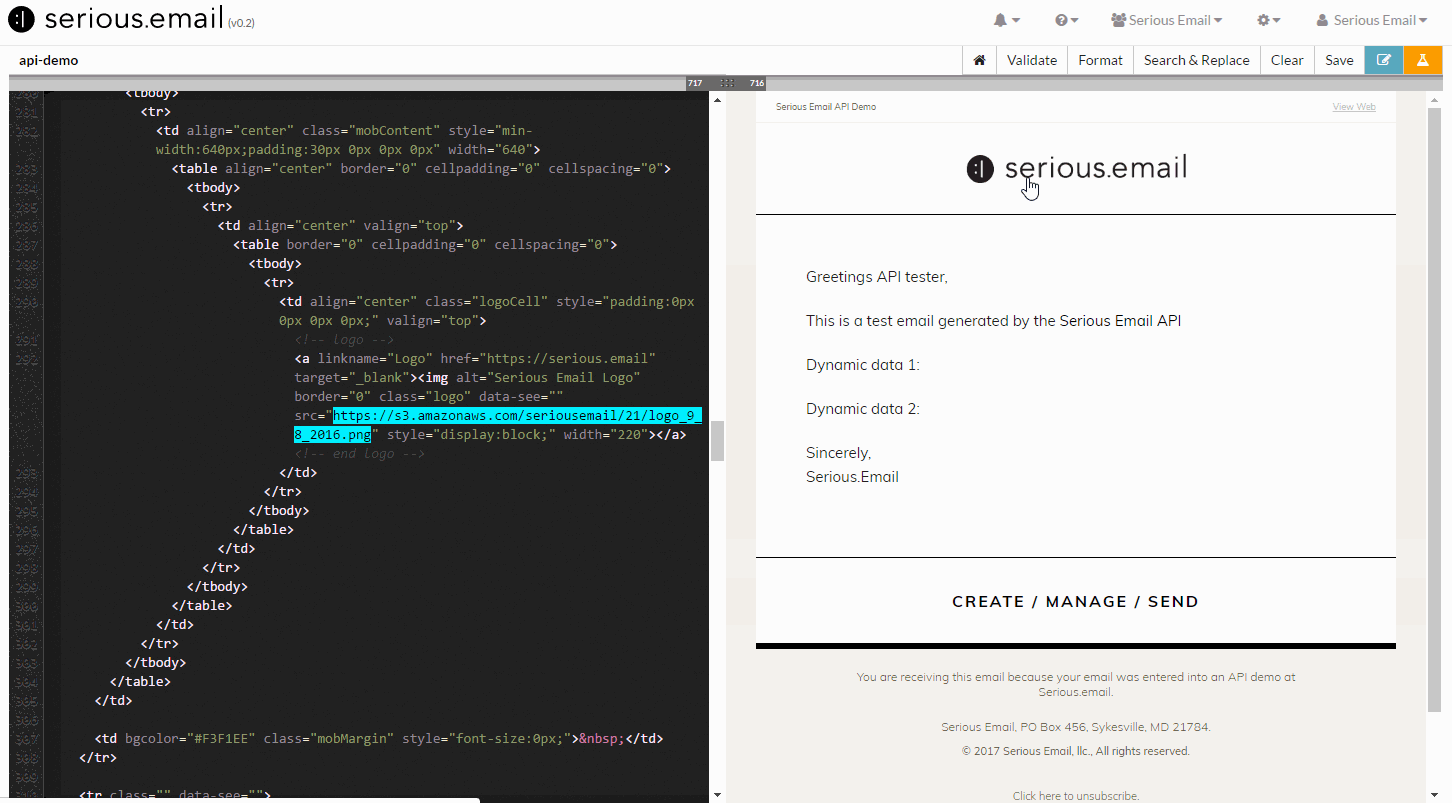
data-see and the <img> Tag
To make an image click-able and editable simply add the data-see attribute. This will make it so when an image is clicked all of it's attributes will populate an editable dialog in the Visual Editor. Additionally, the end user will be able to replace the image by clicking on any thumb-nails present. Here's an example of how to add it:<img data-see="" img alt="Serious Email Logo" border="0" src="https://s3.amazonaws.com/seriousemail/21/logo_9_8_2016.png" style="display:block;" width="220" />
data-see and <td>
To make copy within table data (<td>) click-able and editable simply add the data-see attribute. This will make it so the end user can edit any copy in the <td> as well more complicated HTML editing via WYSIWYG editor. Here's an example of how to add it:<td data-see="" > Hello World. </td>
data-see and the <a> Tag
To make anchor tags (<a>) click-able and editable simply add the data-see attribute. This will reveal a "link" icon. Clicking it will open the "Attribute Editor" where the end user can change any existing attributes. Here's an example of how to add it:<a data-see="" linkname="Logo" href="https://serious.email" target="_blank"> Hello World </a>
data-see and <tr>
Adding the data-see attribute to table rows is unique in that it adds a toolbar to the row creating what we call a "Module". The tool bar allows the end-user to duplicate, delete or move entire modules. Modules are very useful. It gives lay-people the ability to utilize quality HTML without having to understand it's inner workings. When you add a data-see attribute to a table row the end result will look like this:
Entire templates can be comprised of Modules that the end-user can use to very rapidly create their own unique email.data-see background images
Making background images editable is complex in HTML emails because there are many ways it can be done and because we often use Microsoft's VML tags to make it work with Outlook. With this in mind, you can add a special tag to both TD and TABLE tags. Simply add the data-see="bg" attribute to either your TD or TABLE tag. Note that we are including "bg" (short for background) as the attribute value. When an end-user uses this in the Visual Editor it will look for the "background" attribute, as well any hardcoded styles for background images (such as 'background-image' or 'background:url('myimage.jpg')'). It will automatically search for any other image urls that match and update them as well. This means it will automatically update v:fill. Below are some examples of how this would look in your HTML.
In a TD tag:<td data-see="bg" style="text-align: center; background-position: center center !important; background-size: cover !important;" valign="middle" bgcolor="#222222" background="https://s3.amazonaws.com/seriousemail/21/logo_icon_9_8_2016.png">
In a Table tag:<table data-see="bg" style="background-image:https://s3.amazonaws.com/seriousemail/21/logo_9_8_2016.png" class="wrapper" width="640" height="442" cellspacing="0" cellpadding="0" border="0" bgcolor="#222222" background="https://s3.amazonaws.com/seriousemail/21/logo_9_8_2016.png" align="center">
data-see placement
In an effort to keep the end-users experience clean, we can add text to the data-see attribute that will change it's placement. The options are are below. You can combine vertical or horizontal tags for more refined placement.Vertical Placement:
- topin: data-see="topin" will place the icon or tool bar inside the top part of the element.
- topout: data-see="topout" will place the icon or tool bar outside the top part of the element.
- bottomin: data-see="bottomin" will place the icon or tool bar inside the bottom part of the element.
- bottomout: data-see="bottomout" will place the icon or tool bar outside the bottom part of the element.
Horizontal Placement:
- leftin: data-see="leftin" will place the icon or tool bar inside the left part part of the element.
- leftout: data-see="leftout" will place the icon or tool bar outside the left part part of the element.
- rightin: data-see="rightin" will place the icon or tool bar inside the right part part of the element.
- rightout: data-see="rightout" will place the icon or tool bar outside the right part part of the element.